1. Why a CBM calculation is not a load plan
Dividing total cargo volume by nominal container capacity treats freight like a liquid: 11 m³ of cargo into a 33 m³ container looks like a third of the space. Real packages are rigid boxes and crates. Five effects decide whether they actually fit, and none of them appears in a CBM figure:
- Piece geometry. Pieces do not deform. A 1.3 m long crate leaves the last 0.4 m of a row unusable, and those gaps repeat across the whole floor. The larger the pieces relative to the equipment, the more nominal volume remains empty.
- Door dimensions. A standard 20' container is 239 cm high inside, but its door opening is only about 228 cm. A 235 cm tall crate passes the volume check and the interior height check, and still cannot be loaded through the door.
- Stackability. If cargo must not be stacked, or only carries limited weight on top, the height of the container above the first layer is lost. Non-stackable cargo fills a trailer floor long before it fills its cube.
- Payload. Dense cargo hits the weight limit first: a 20' DC accepts roughly 28 tonnes, so machine parts can max out a container that is still three quarters empty by volume.
- Loading order and handling constraints. Priority cargo near the door, floor-only pieces, and rotation or tilt restrictions all reduce how tightly a real plan can pack.
A useful plan therefore has to place every piece geometrically, respect doors, payload, and stacking rules, and only then count the equipment units. That is exactly what a 3D load calculation does, and why its result can differ sharply from a volume division.
2. Choosing equipment: a practical decision framework
The second planning decision is which equipment to test at all. The table shows the planning values of five common equipment types, as used by the presets of the free public version of the Spoterix Load Calculator. Actual dimensions and limits vary by carrier and equipment series, so treat them as planning values, not as a guarantee.
| Equipment | Internal dimensions (L × W × H) | Door (W × H) | Payload | Typical use |
|---|---|---|---|---|
| 20' DC container | 589.8 × 235.2 × 239.3 cm (≈ 33 m³) | 234 × 228 cm | 28,200 kg | Dense, heavy cargo; smaller ocean shipments |
| 40' HC container | 1,203.5 × 235.2 × 269.5 cm (≈ 76 m³) | 234 × 257.7 cm | 28,620 kg | Voluminous or tall ocean cargo |
| EU 13.6 m curtain trailer (standard) | 1,362 × 248 × 270 cm | 245 × 267 cm | 24,000 kg | European road freight, billed in loading metres |
| Air freight pallet P6P/PMC (main deck) | 317.5 × 243.8 cm base, up to 300 cm height | open | 6,804 kg | Air freight build-up planning |
| EPAL 1 Euro pallet | 120 × 80 cm footprint, 200 cm build height in the tool | open | 1,500 kg (tare 25 kg) | Pre-packing pieces into pallet units |
Three questions narrow the choice quickly:
- Is the load weight-driven or volume-driven? Divide total weight by total volume. Above roughly 850 kg/m³ a 20' DC usually reaches payload before space; clearly below, the 40' HC or a trailer earns its larger cube.
- Does the tallest piece pass the door? Compare piece height against door heights, not interior heights. Overheight pieces point to open top or flat rack equipment, which the Pro version covers.
- Should pieces travel on pallets? Palletising standardises handling and stacking, but adds pallet footprint, build height, and tare. The calculator can pack pieces onto pallets first and then load the built pallets, so both variants can be compared instead of guessed.
When two options remain plausible, test both. The calculation is fast enough to compare a 20' DC against a 40' HC, or direct loading against palletised loading, in a few minutes.
3. Walkthrough: plan a load in the free Load Calculator
The free public version of the Spoterix Load Calculator runs in the browser without a login. It includes two cargo rows and five standard equipment presets (the ones in the table above); the Pro version for Spoterix users adds more rows, the full equipment catalog, and custom equipment. An overview of both versions is on the Load Calculator page. The walkthrough below uses the built-in example plan, which you can reproduce with one click on Load example in the empty 3D view.
Step 1: describe the cargo per piece type
Enter one row per cargo type with dimensions, weight per piece, and quantity. The handling flags matter as much as the numbers: Rotate (90°) allows the packer to turn a piece on the floor plan, Tilt allows laying it on its side, Stackable and Max stack kg control what may rest on top, and Floor only pins a piece to the equipment floor. The example uses 10 machine crates of 120 × 80 × 95 cm at 180 kg and 24 cartons of 60 × 40 × 40 cm at 12 kg.
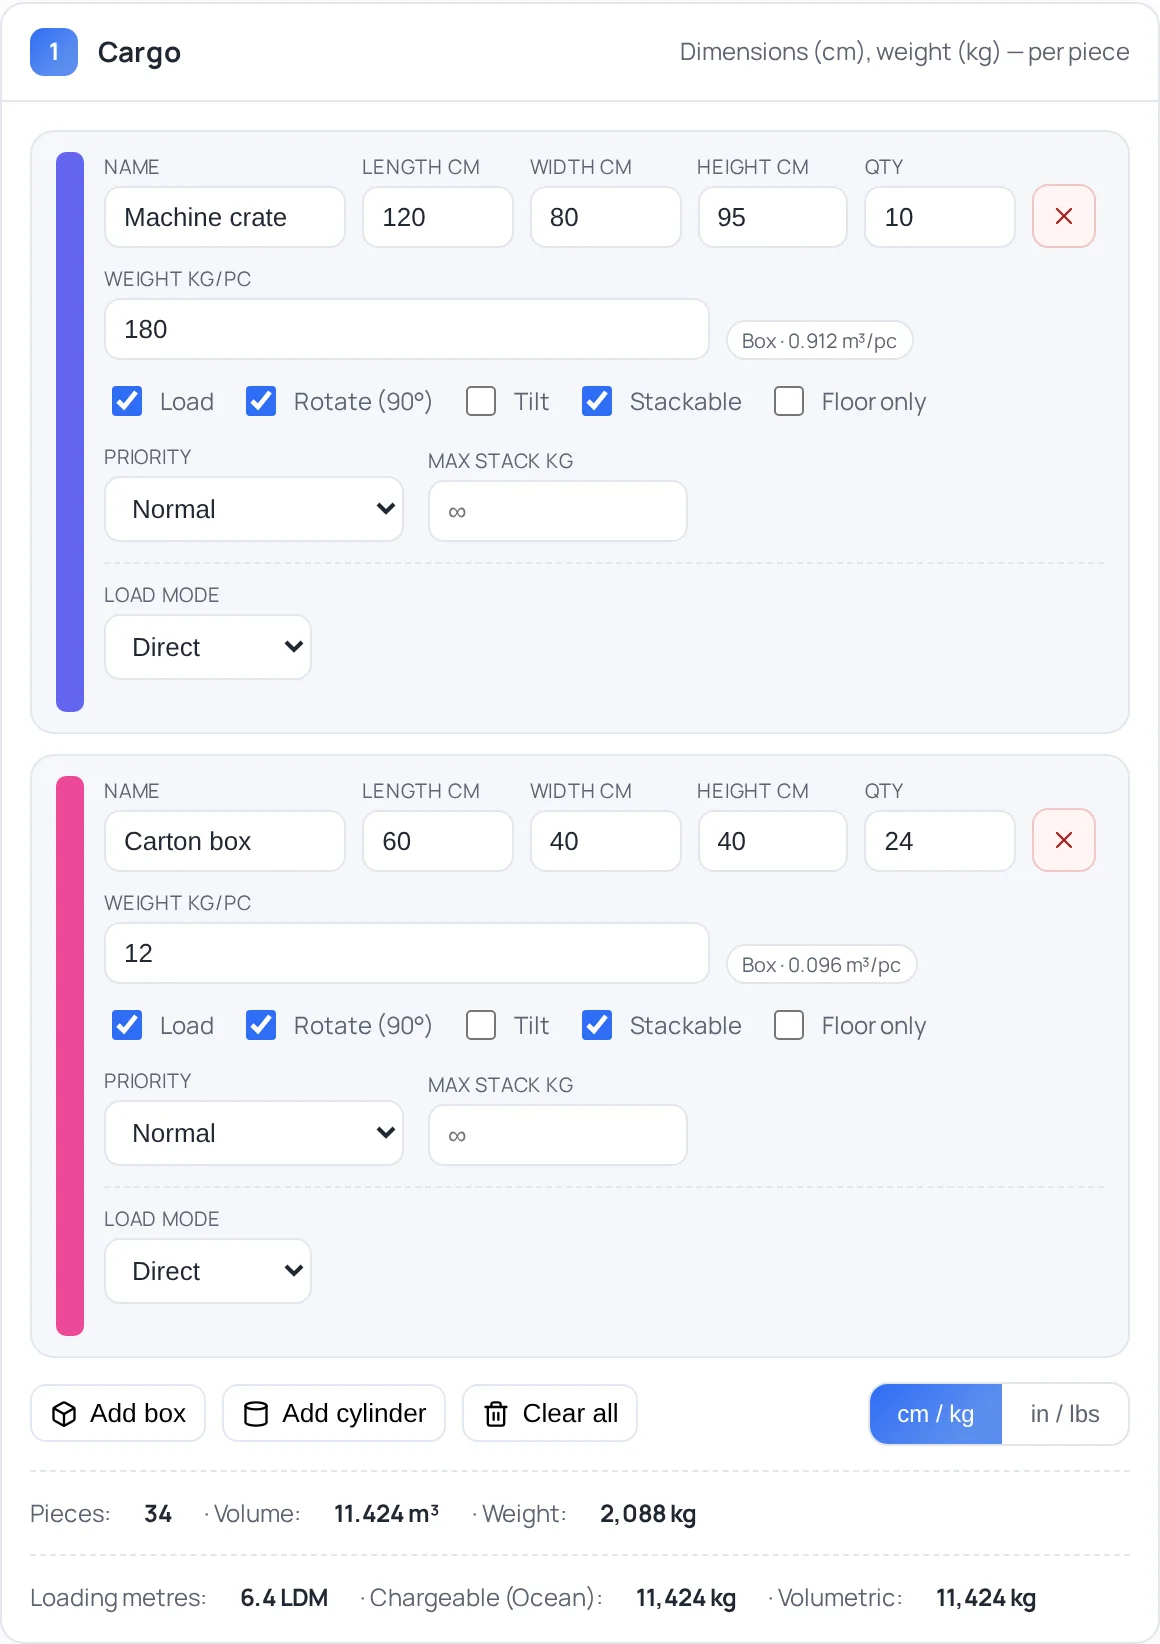
Step 2: select the equipment to test
Pick one or more equipment types from the dropdown. The example uses one 40' HC container. If the quantity is left to the calculator, it multiplies equipment automatically until everything is loaded, so the result answers the practical question: how many units of this type does the shipment need?
Step 3: read the result header
The calculation runs automatically after each change. The result header answers four questions at once: Equipment needed (how many units), Loaded (how many pieces found a place), Volume utilisation, and Weight utilisation. In the example, all 34 pieces load into one 40' HC at 15% volume and 7.3% weight utilisation, so one container is enough with plenty of reserve.
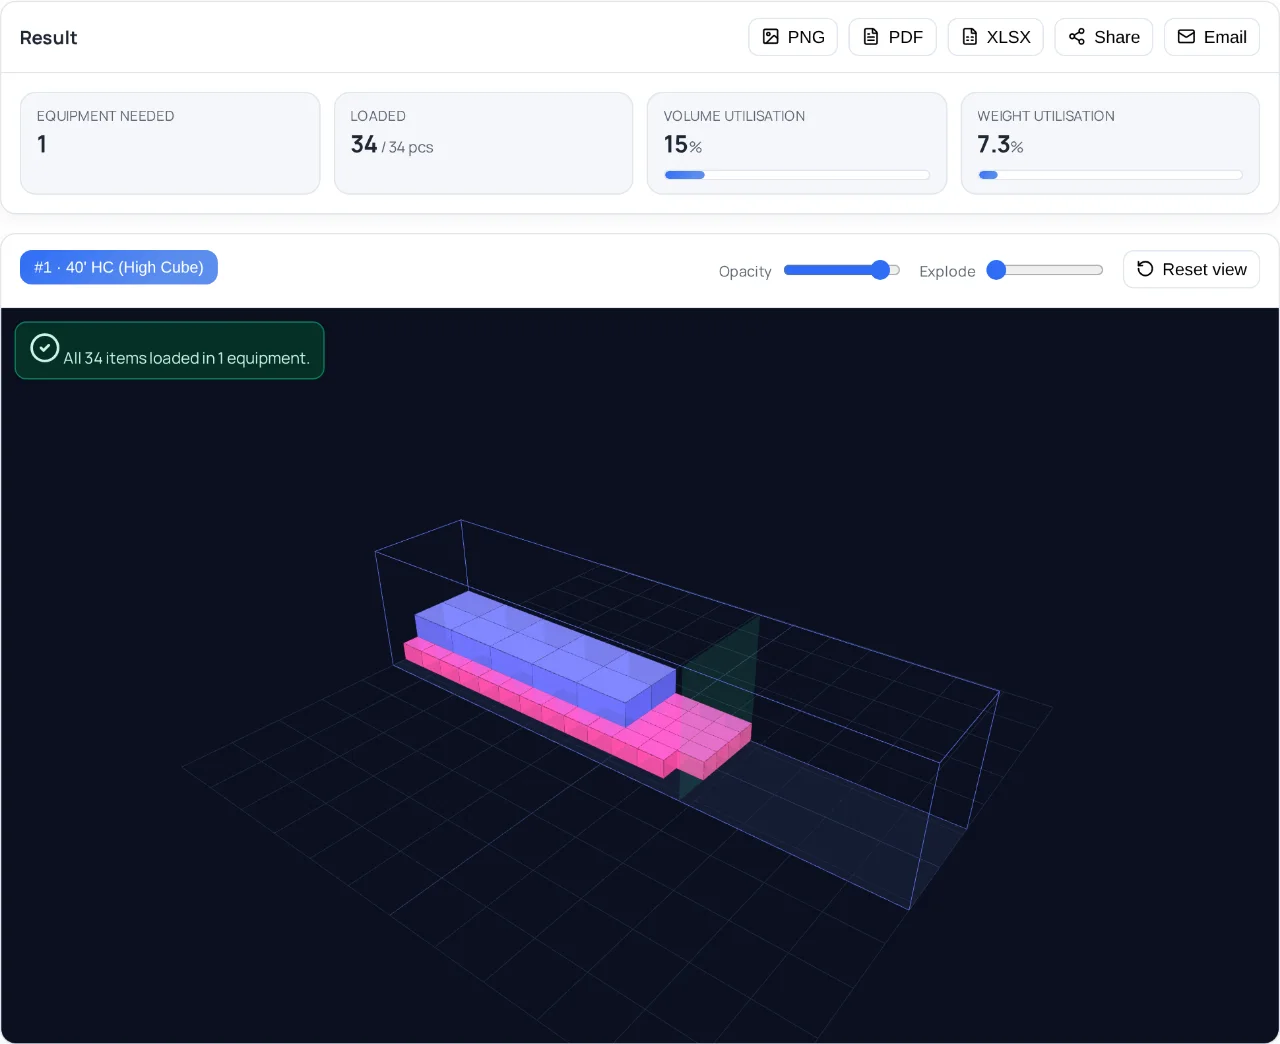
Step 4: inspect the 3D plan and any unloaded pieces
The 3D view shows where each piece sits, filled from the rear towards the door. If pieces remain unloaded, the calculator lists them with the likely reason: too big for the equipment or its door, too heavy for the payload, no space left, or not fitting the selected pallet. It also raises advisory warnings for implausible inputs, for example an unusually high density or a piece heavier than the pallet payload. Treat both lists as review prompts, not as errors.
Step 5: check the equipment detail
The equipment detail card breaks the plan down per unit: used volume and weight, centre of gravity, front/rear and left/right balance, used length, and which cargo went into the unit. In the example the load uses 780 cm of the container length and sits clearly towards the rear, which the balance line flags. That is the cue to review the arrangement with the loading team before anyone books equipment.
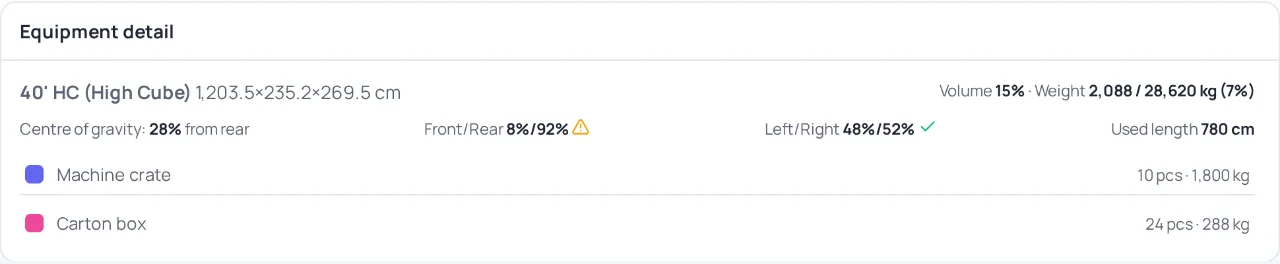
4. Reading loading metres and chargeable weight
Below the cargo totals, the calculator shows a freight metrics line. It translates the geometric plan into the figures carriers quote against:
- Loading metres (LDM) measure occupied trailer length in road freight. The calculator spreads the floor footprint of the load over a standard 2.40 m lane width and rounds up to 0.1 LDM; stacked pieces do not count extra floor. A 13.6 m trailer offers about 13.6 LDM. The example load needs 6.4 LDM, so it would occupy nearly half a trailer floor despite its modest 11.4 m³.
- Volumetric and chargeable weight convert volume into weight for billing. The calculator uses the common conversions of 1:6000 for air, 1:5000 for courier, and 1 m³ = 1,000 kg for ocean LCL; for road it applies the widespread 1,750 kg per LDM convention. Chargeable weight is the higher of actual and converted weight. The example weighs 2,088 kg, but as ocean LCL it is billed on 11,424 kg, because volume governs.
Individual carriers and contracts can apply different factors. For the billing side in depth, including per-piece calculations and a custom divisor, use the free Spoterix Chargeable Weight Calculator. The calculation method itself, with measuring rules, break-even densities and invoice checks, is explained in How to calculate chargeable weight.
5. What the plan does not replace
- The result is a planning aid. It does not replace certified load securing, axle-load verification, dangerous-goods checks, packaging strength assessments, or the carrier’s approval of the final stowage.
- Equipment presets are typical planning values. Confirm internal dimensions, door sizes, and payload against the equipment actually assigned to the shipment.
- Stacking and handling rules are only as good as the inputs: the engine respects the flags you set, it cannot know packaging strength on its own.
- The free public version covers two cargo rows and five equipment presets. Larger plans, custom equipment, saved calculations, and exports are part of the Pro version for Spoterix users, described on the Load Calculator page.
Once the load plan is settled, the equipment decision feeds directly into transport buying: a shipment specified as “one 40' HC” or “6.4 LDM” produces comparable freight quotes. How to turn that into a structured request is covered in How to create a Spot Request.